A-Bash Book User Guide
Table of Contents
- Table of Contents
- What is A-Bash Book?
- Graphical User Interface
- How to Use the User Guide
- Quickstart Guide
- Understanding Command Syntax
-
Features
- Adding a Person:
add - Editing Persons:
edit - Deleting Persons:
delete - Listing All Persons:
list -
Locating Persons:
find - Filter Field Visibility:
filter - Selecting Persons:
select - Email Persons:
email -
Tagging Persons:
tag -
Aliasing Commands :
alias - Autocomplete
- Viewing Help :
help - Clearing All Entries :
clear - Exiting A-Bash Book :
exit - Saving the Data
- Editing the Data File
- Adding a Person:
- FAQ
- Command Summary
- Field Summary
- Glossary
What is A-Bash Book?
A-Bash Book (ABB) is a powerful Employee and Business Contact Management System.
A contact management system serves as a centralised platform for organizations to store contacts important to the company.
A-Bash Book comes with features that facilitate quick access and bulk operations to super charge your organization’s work flow.
A-Bash Book also uses a Command Line Interface (CLI) and is fully operable by keyboard. Not only is the interface optimized for fast typists, but intuitive and welcoming for new users.
As employees come and go, their business contacts can be lost with them. Besides serving as a centralised platform, A-Bash Book was built to solve this problem by ensuring all the necessary contacts still remain in the system.
Graphical User Interface
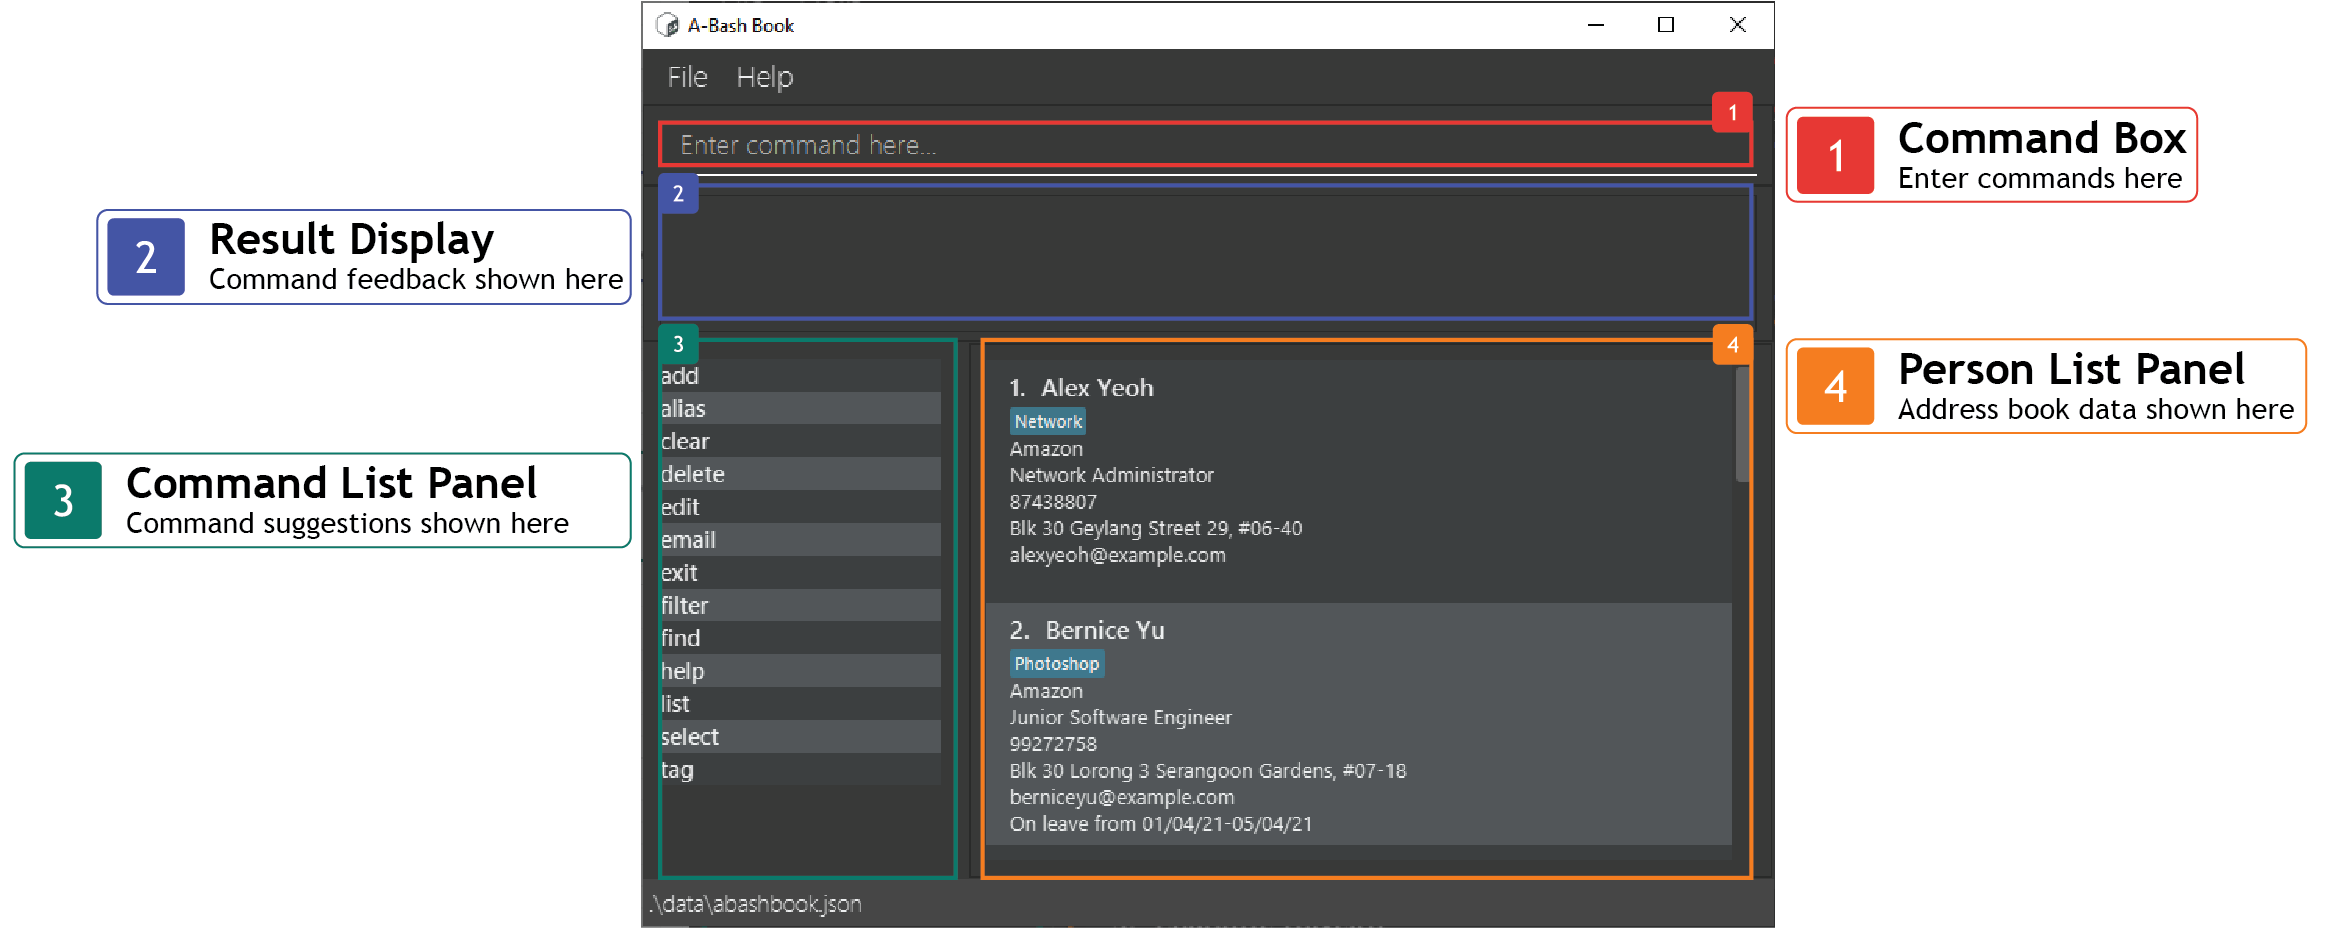
A-Bash Book’s graphical user interface can be categorized into 4 components.
- Command Box
- Result Display
- Command List Panel
- Person List Panel
You may begin by typing in your command in the Command Box and hitting Enter to execute the command. A status message of the command will be displayed in the Result Display.
On the left side, you may reference the available commands in the Command List Panel.
Lastly, all persons will be displayed on the right side in the Person List Panel.
Person List Panel
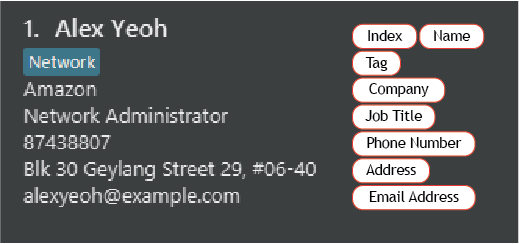
Each person in the Person List Panel can have data.
This data is stored in their respective fields and can be identified by referring to the image above.
For more information on fields, you may refer to the Field Summary.
How to Use the User Guide
You can use the Table of Contents to quickly navigate around the User Guide.
Before you continue reading the rest of the User Guide, take note of the following typographic conventions which are used to place emphasis on certain texts:
| Style | Description |
|---|---|
Code |
Command text. |
| Keyboard | Keyboard shortcut. |
| Bolded Text | Important words to take note of. |
| Useful information. | |
| Helpful information that can enhance your experience. | |
| Potentially dangerous action that might cause data loss. |
Quickstart Guide
-
Ensure that you have Java 11 or above is installed in your computer.
-
Download the latest abashbook.jar from here.
-
Copy the abashbook.jar to your preferred target folder to use as the home folder to contain the A-Bash Book data. See FAQ: What is the Home Folder? to understand more.
-
Double-click the abashbook.jar to start the app. The program window should appear in a few seconds. Note that the app contains some sample data, as seen in the picture below.
-
Type the command in the command box and press Enter to execute it. e.g. typing
helpand pressing Enter will open the help window.
Some example commands to try:-
help: Opens the Command Summary in the app. -
list: Lists all persons. -
add -n John Doe -p 98765432 -e johnd@example.com -c Google -j HR Manager -a John street: Adds a person namedJohn Doeto the system. -
delete 3: Deletes the 3rd person shown in the current list. -
clear: Deletes all persons. -
exit: Exits the app.
-
-
Refer to the Features below for details of each command.
Understanding Command Syntax
A-Bash Book utilises the Command Line Interface (CLI) which is a text-based interface for users to enter commands. In order to interpret commands correctly, these commands have to be structured properly. This is known as the syntax where a specific arrangement of words and parameters form a command that A-Bash Book can understand.
![]() Note
Note
For seasoned CLI users, A-Bash Book uses command syntax which are similar to your typical command line. If you are already familiar with the command syntax, feel free to skip to Features.
Examples of Command
Here are some examples of how a command is documented in A-Bash Book:
select { clear | shown | show | INDEX... }edit { shown | selected | INDEX... } [-n NAME] [-r REMARK] [-t TAG]...tag delete { shown | selected | INDEX... } -t TAG [-t TAG]...
Command Flags
Command flags are specific options that can be specified to add more information in a command.
e.g. add -n John Doe -p 94326543 -e john@doe.com -a 45 Address #06-90
Command: add
Command flags: -n , -p, -e, -a
Command flags might also take an argument, for example, -n John Doe or -n -a -c.
Uppercase Words
Words in UPPER_CASE are the parameters that you can specify.
e.g. in add -n NAME, NAME is a parameter which can be used as add -n John Doe.
Optional Parameters
Square brackets [ ] are used around an optional parameter.
If there are multiple optional parameters, each optional parameter is enclosed in its own set of square brackets.
e.g. -n NAME [-t TAG] can be used as -n John Doe -t friend or as -n John Doe but
not -t friend.
Parameters That Can Repeat
Ellipsis (...) indicates the option to use a parameter multiple times, including zero times.
e.g. [-t TAG]... can be used as "" (i.e. 0 times), -t friend (i.e. 1 time), -t friend -t family (i.e. 2 times) etc.
e.g. -t TAG [-t TAG]... specifies that there must be at least one tag and can be used
as -t family and -t family -t cousin -t child.
Mutually Exclusive Parameters
Braces ({ }) are used around arguments where you must choose only one of the items inside the braces.
Vertical bars (|) are used to separate the items. There can be more than two
mutually exclusive parameters.
e.g. select { clear | shown | show | INDEX...} can be used as:
select clearselect shownselect showselect 1select 1 2 3
Invalid examples are:
select clear showselect clear 1 2 3
Additional Information
-
If a parameter is expected only once in the command, but is specified multiple times, only the last occurrence of the parameter will be taken.
e.g.-p 12341234 -p 56785678, only-p 56785678will be taken. -
Extraneous parameters for commands that do not take in parameters (such as
help,list,exitandclear) will be ignored.
e.g. if the command specifieshelp 123, it will be interpreted ashelp. -
shownis a special index that refers to all persons that are visible in the filtered person list. e.g.find surnameshows 10 persons. Executingselect shownwill select all 10 of the persons. -
selectedis a special index that refers to all persons that are selected using the Select Command.
Features
![]() Note
Note
If you are not familiar with the command syntax, please refer to the Command Syntax before proceeding.
Adding a Person: add
Adds a person to the system.
Format: add -n NAME -p PHONE_NUMBER -e EMAIL -c COMPANY -j JOB_TITLE -a ADDRESS [-r REMARK] [-t TAG]...
- A person can have no remark.
- A person can have zero or more tags.
Examples:
| Example | Description |
|---|---|
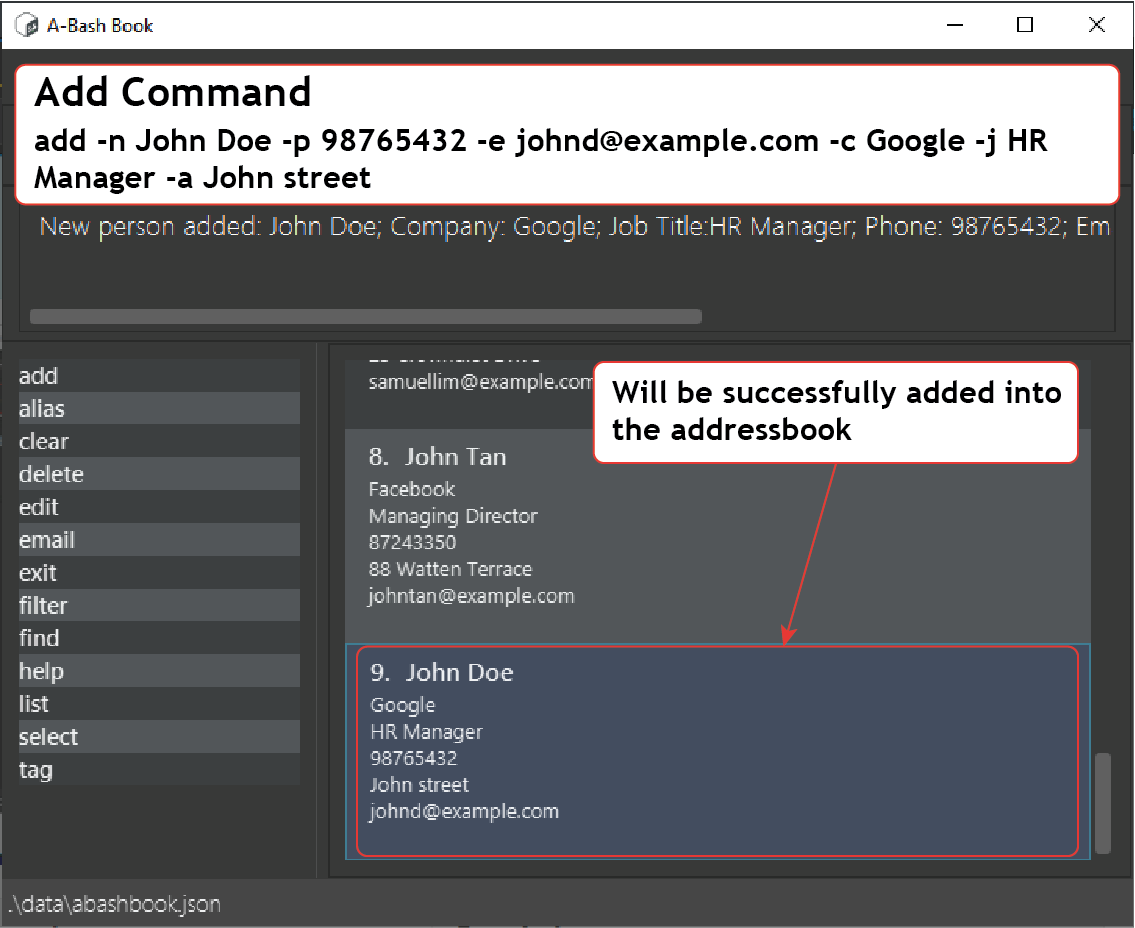
add -n John Doe -p 98765432 -e johnd@example.com -c Google -j HR Manager -a John street |
Adds a person named John Doe, with phone number 91234567, email address johndoe@example.com, company Google, job title HR Manager, and address John street. |
add -n Betsy Crowe -p 1234567 -e betsycrowe@example.com -c Amazon -j Manager -a Betsy Avenue -t Recruiter -t Manager |
Adds a person named Betsy Crowe, with phone number 1234567, email address betsycrowe@example.com, company Amazon, job title Manager, and address Betsy Avenue. This person is also tagged with the following tags: Recruiter and Manager. |
add -n Charlie -p 7654321 -e charlie@example.com -c Facebook -j Software Engineer -a Charlie Road -t IT -r Emergency contact |
Adds a person named Charlie, with phone number 7654321, email address charlie@example.com, company Facebook, job title Software Engineer, and address Charlie Road. This person is also tagged with the tag IT, and has the remark Emergency contact. |
Editing Persons: edit
Edits the specified persons in the system.
Format: edit { shown | selected | INDEX... } [-n NAME] [-p PHONE] [-c COMPANY] [-j JOB_TITLE] [-e EMAIL] [-a ADDRESS] [-r REMARK] [-t TAG]...
- Edits the person at the specified
INDEX,INDEX..., shown or selected persons. The index refers to the index number shown in the displayed person list. The index must be a positive integer, i.e 1, 2, 3, … - At least one of the optional fields must be provided.
- Existing values will be updated to the input values.
- When editing remark, the existing remark of the person will be removed, i.e. adding of remark is not cumulative.
- When editing tags, the existing tags of the person will be removed, i.e. adding of tags is not cumulative.
- To remove the person’s remark, type
-rwithout specifying any remark after it. - To remove all the person’s tags, type
-twithout specifying any tags after it. - To edit all the shown persons, type
edit shown. - To edit all the selected persons, type
edit selectedfollowed by the parameters.
Examples:
| Example | Description |
|---|---|
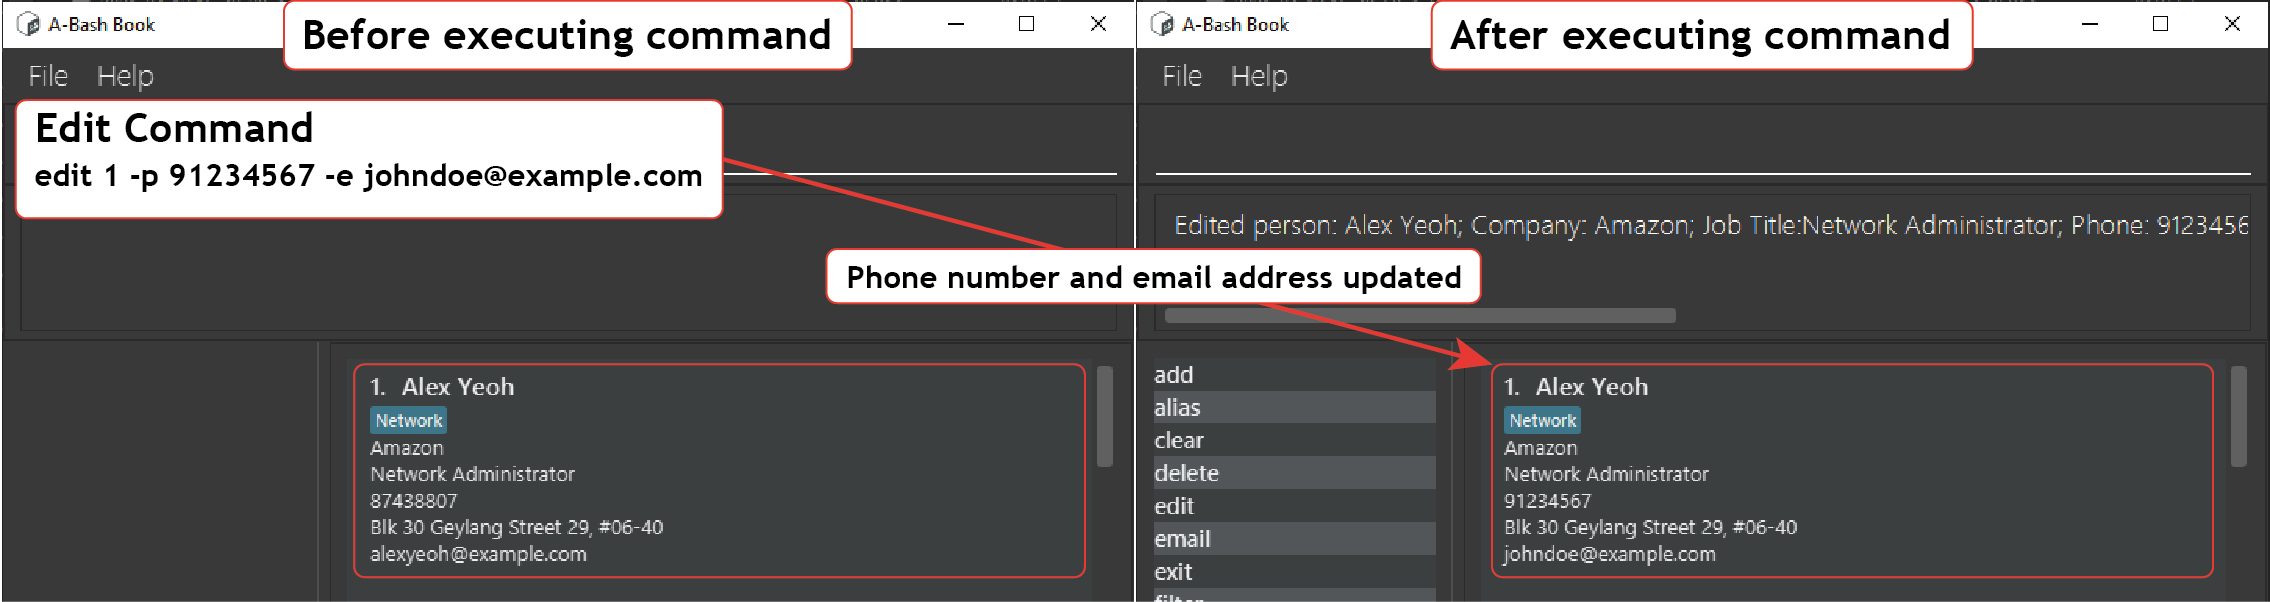
edit 1 -p 91234567 -e johndoe@example.com |
Edits the phone number and email address of the 1st person to be 91234567 and johndoe@example.com respectively. |
edit 2 -n Betsy Crower -t |
Edits the name of the 2nd person to be Betsy Crower and clears all of her existing tags. |
edit 3 -r |
Clears any existing remark of the 3rd person. |
edit shown -r |
Clears any existing remark of all the displayed persons in person list. |
edit selected -r |
Clears any existing remark of all the selected persons. |
![]() Tip
Tip
You can bulk edit persons with:
-
edit 1 2 3to edit persons at indexes 1, 2 and 3. -
edit shownto edit all the shown persons. -
edit selectedto edit all the selected persons.
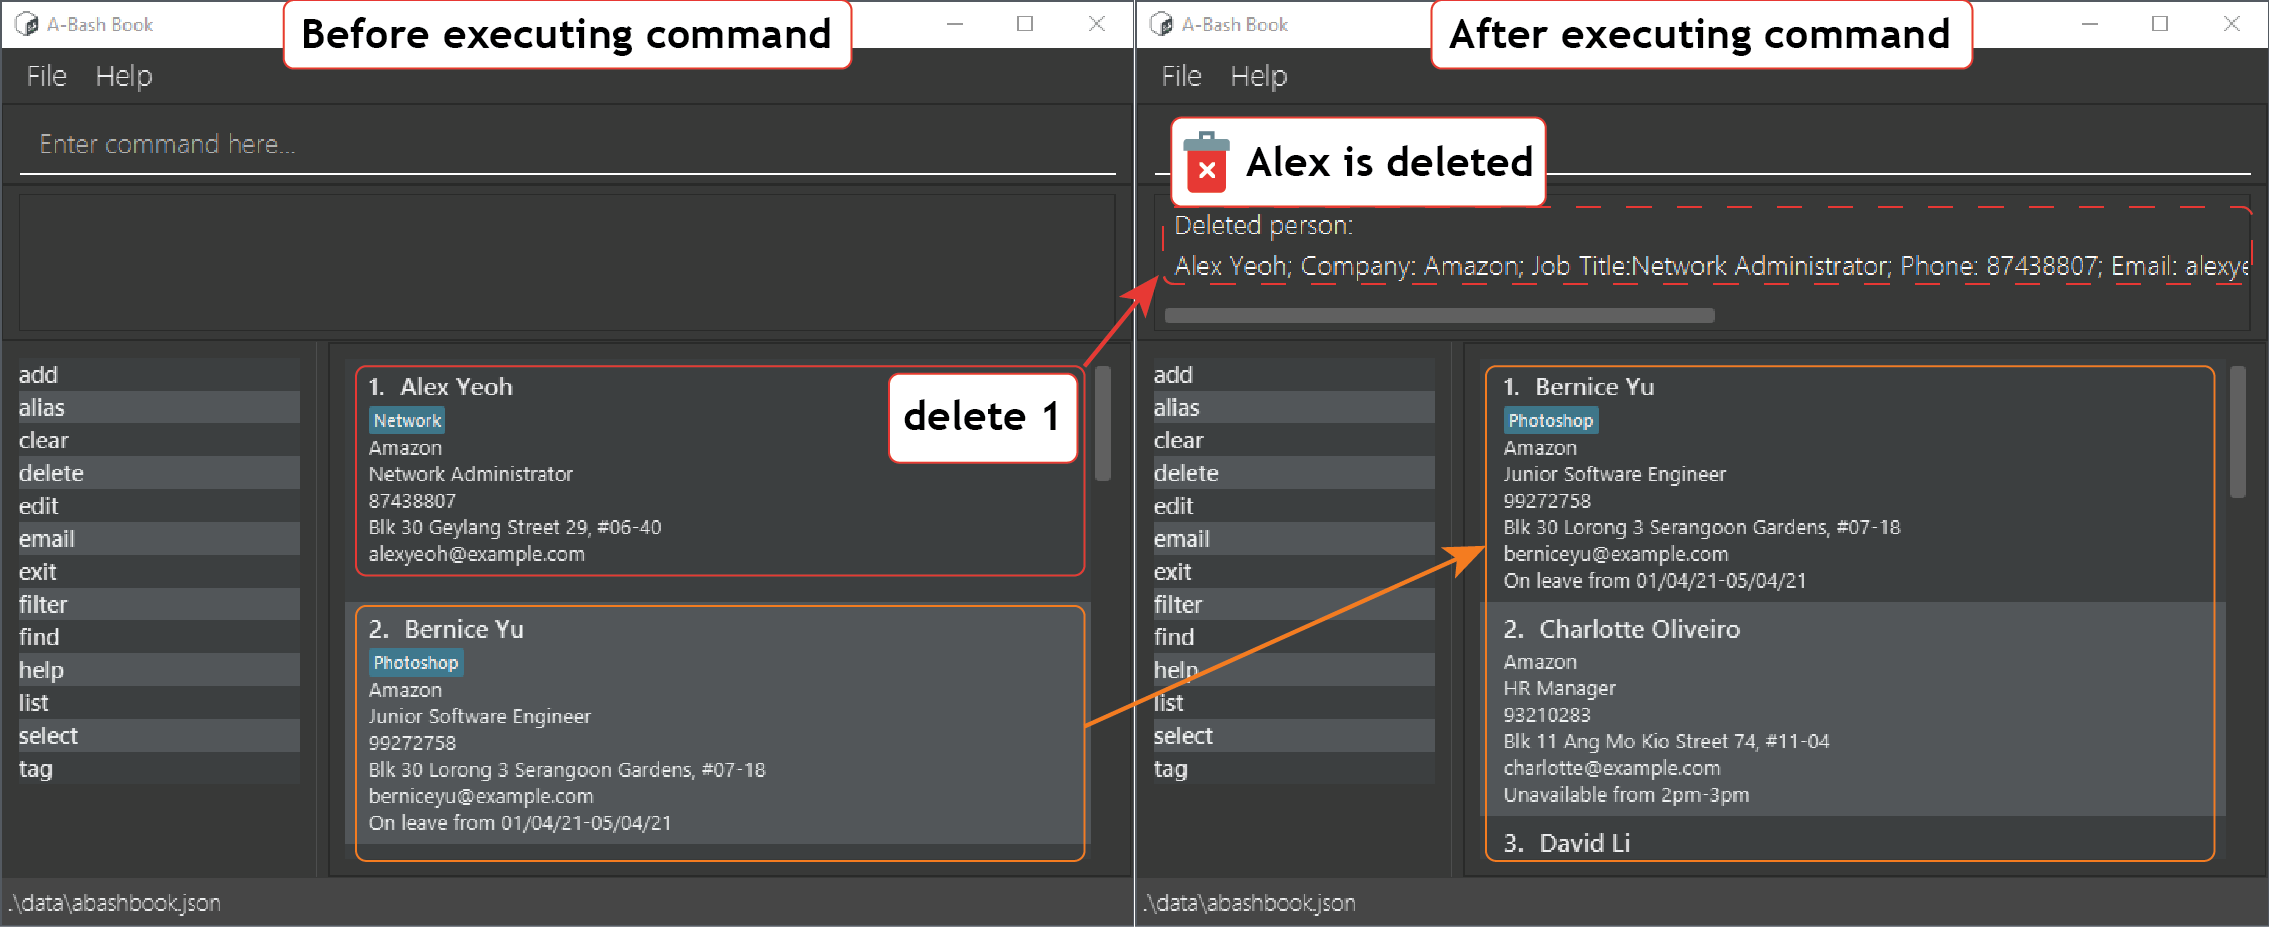
Deleting Persons: delete
Deletes the specified persons in the system.
Format: delete { shown | selected | INDEX... }
- Deletes the person at the specified
INDEX,INDEX..., shown or selected persons. - The command operates on the shown list that may be modified by an earlier command.
- The index refers to the index number shown in the displayed person list.
- The index must be a positive integer, i.e. 1, 2, 3, …
- To delete all the shown persons, type
delete shown. - To delete all the selected persons, type
delete selected.
Examples:
| Example | Description |
|---|---|
listdelete 2
|
list displays all entries.delete 2 deletes the second entry in the list shown. |
find Betsydelete 1
|
find Betsy filters entries to the find result.delete 1 deletes the first entry in the filtered results list. |
select 1 2 3 delete selected
|
Deletes selected entries 1, 2 and 3. |
delete shown |
Deletes all the displayed persons in the person list. |
![]() Tip
Tip
You can bulk delete persons with:
-
delete 1 2 3to delete persons at indexes 1, 2 and 3. -
delete shownto delete all the shown persons. -
delete selectedto delete all the selected persons.
Listing All Persons: list
Lists all persons in the system.
Format: list
Locating Persons: find
Finds persons whose fields contain any of the given keywords.
Format: find { KEYWORD... | -n NAME... | -e EMAIL... | -t TAG... | -r REMARK... }
- Currently searchable fields: Name, Email, Tag, Remark.
- The search is case-insensitive. e.g.
hanswill matchHans. - The order of the keywords does not matter. e.g.
Hans Bowill matchBo Hans. - Words are partially matched. e.g.
samwill matchSamantha. - Similar words are matched. e.g.
Shawnwith matchShaun. - Partially similar words will also be matched as a result of the above. e.g.
Benwill matchElizabethasbetinElizabethis 1 character away fromBen. - Persons matching at least one keyword will be returned. e.g.
Hans Bowill returnHans GruberandBo Yang.

Searching All Searchable Fields
The find command will execute for all searchable person fields if no command flags are specified.
Format: find KEYWORD [MORE_KEYWORDS]
Examples:
| Example | Description |
|---|---|
find Jon |
Returns any person that matches jon partially in any of the searchable fields.e.g. a person tagged as Janitor (Jon is similar to Jan). |
find alex david |
Returns any person that matches alex ordavid partially in any of the searchable fields.e.g. persons named Alex Yeoh, David Li. |
Searching by Specific Fields
The find command will execute for specific person fields if you specify the respective flags.
Format: find {-n NAME... | -e EMAIL... | -t TAG... | -r REMARK... }
- Currently searchable fields: Name, Email, Tag, Remark.
- You can only search 1 field at a time. e.g.
find -n Alice -t HRis an invalid command.
Examples:
| Example | Description |
|---|---|
find -n Alice Ben |
Returns persons named Alicia Yen (Similar) and Benjamin Koh (Partial). |
find -t Market |
Returns persons tagged with Marketing (Partial). |
find -r Manager |
Returns persons with Management Intern (Similar) and Human Resource Manager (Partial) in their remarks. |
Filter Field Visibility: filter
Toggle the visibility of person fields in Person List Panel to allow you to hide fields that you are not interested in.
Format: filter [-n] [-e] [-c] [-j] [-a] [-p] [-t] [-t]
- Flags in the filter command do not need an argument.
- Only flags that are indicated will be visible.
- Refer to the Field Summary for all available person fields.
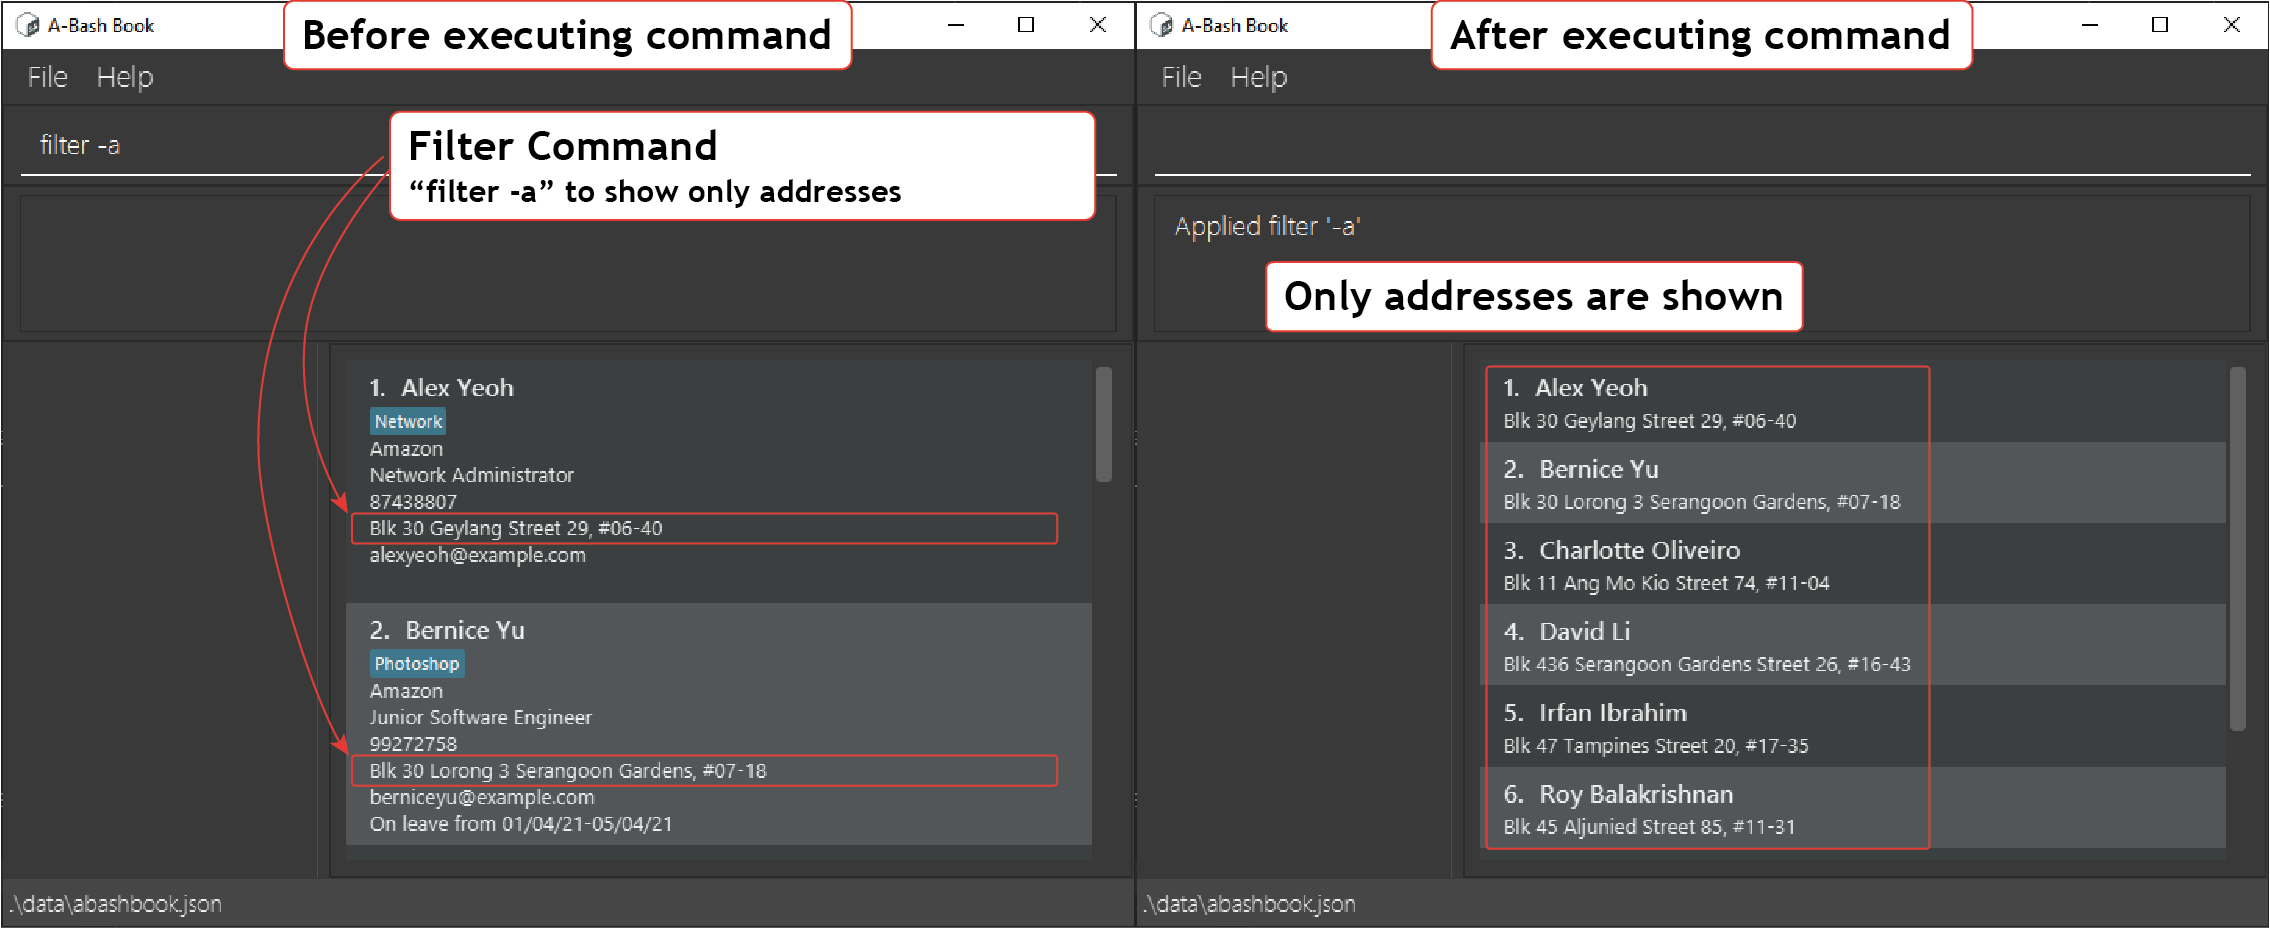
Examples:
| example | description |
|---|---|
filter |
Shows all fields. |
filter -a |
Shows the person’s name and address only. |
filter -a -p |
Shows the person’s name, address and phone number only. |
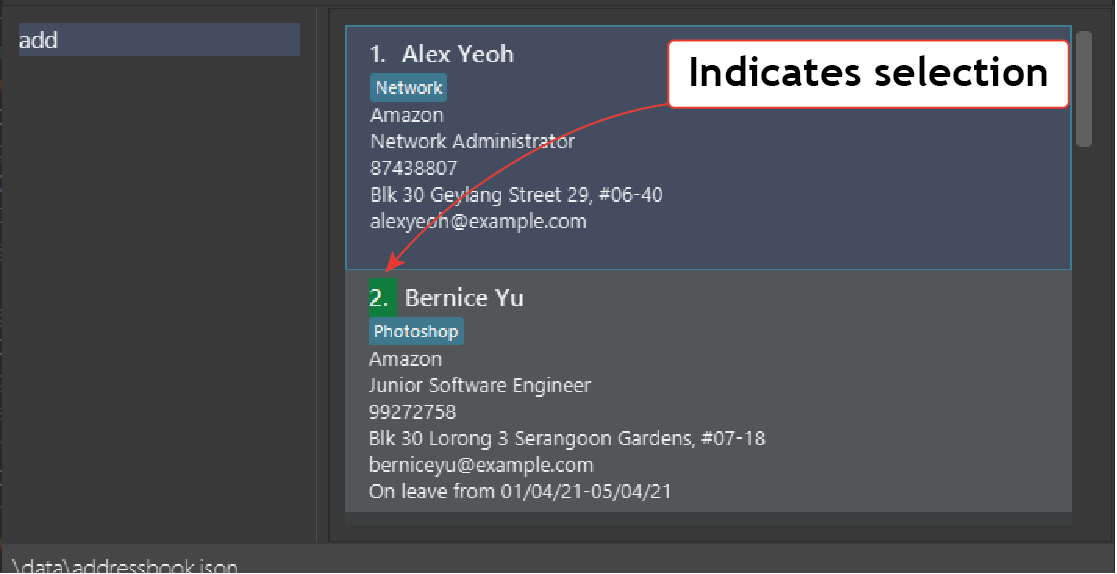
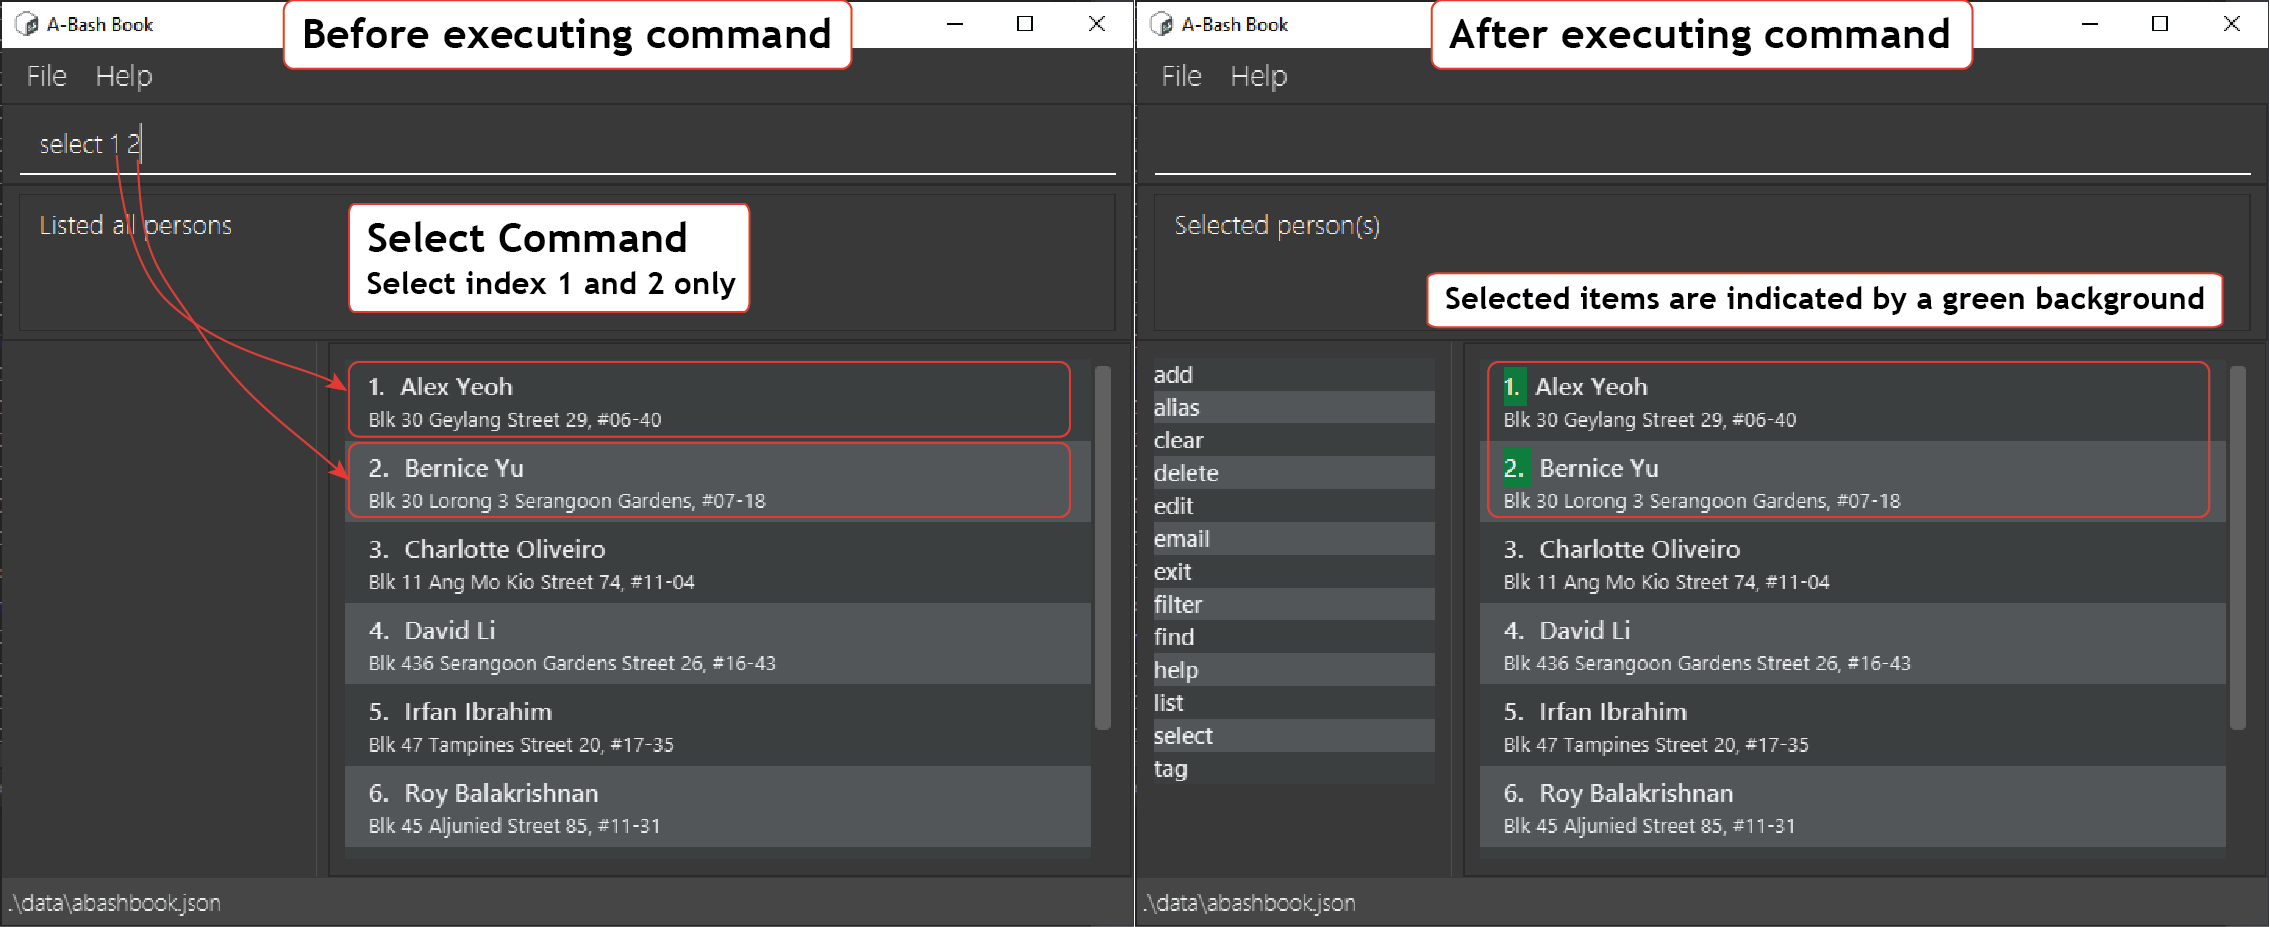
Selecting Persons: select
Allows you to incrementally select multiple person objects to apply actions on.
Format: select { clear | shown | show | INDEX... }
- The selected person(s) will have a highlighted index number to indicate selection status.
- Incremental selection means that selected items are “stacked” together. e.g. Executing
select 1. followed byselect 2will result in persons with index number 1 and 2 being selected. -
shownrefers to all the persons that are currently displayed in the Person List Panel.
Sub Command Format:
select showselect clearselect shownselect INDEX...
Examples:
| Example | Description |
|---|---|
select show |
Shows the selected person(s). |
select shown |
Selects all the person in the visible person list (visible person list refers to the list of persons that are currently displayed). |
select clear |
Clears the current selection. |
select 1 |
Select the person with index 1 (incremental selection). |
select 1 2 |
Select persons with index 1 and 2 (incremental selection). |
![]() Tip
Tip
select command is best used with the following commands:
Email Persons: email
Email one or more persons using the operating system’s default email client. Email client must be configured to allow comma separated email values.
![]() Note
Note
It is a known issue that Outlook for Windows does not have “Commas to Separate Multiple Email Recipients” feature turned on. Follow the guide here to enable it: https://www.lifewire.com/commas-to-separate-email-recipients-1173680
It is not possible for A-Bash Book to detect if the email client is opened. If
executing email command does not trigger the email client to appear, please check that an email
client is installed and configured properly.
Format: email { shown | selected | INDEX... }
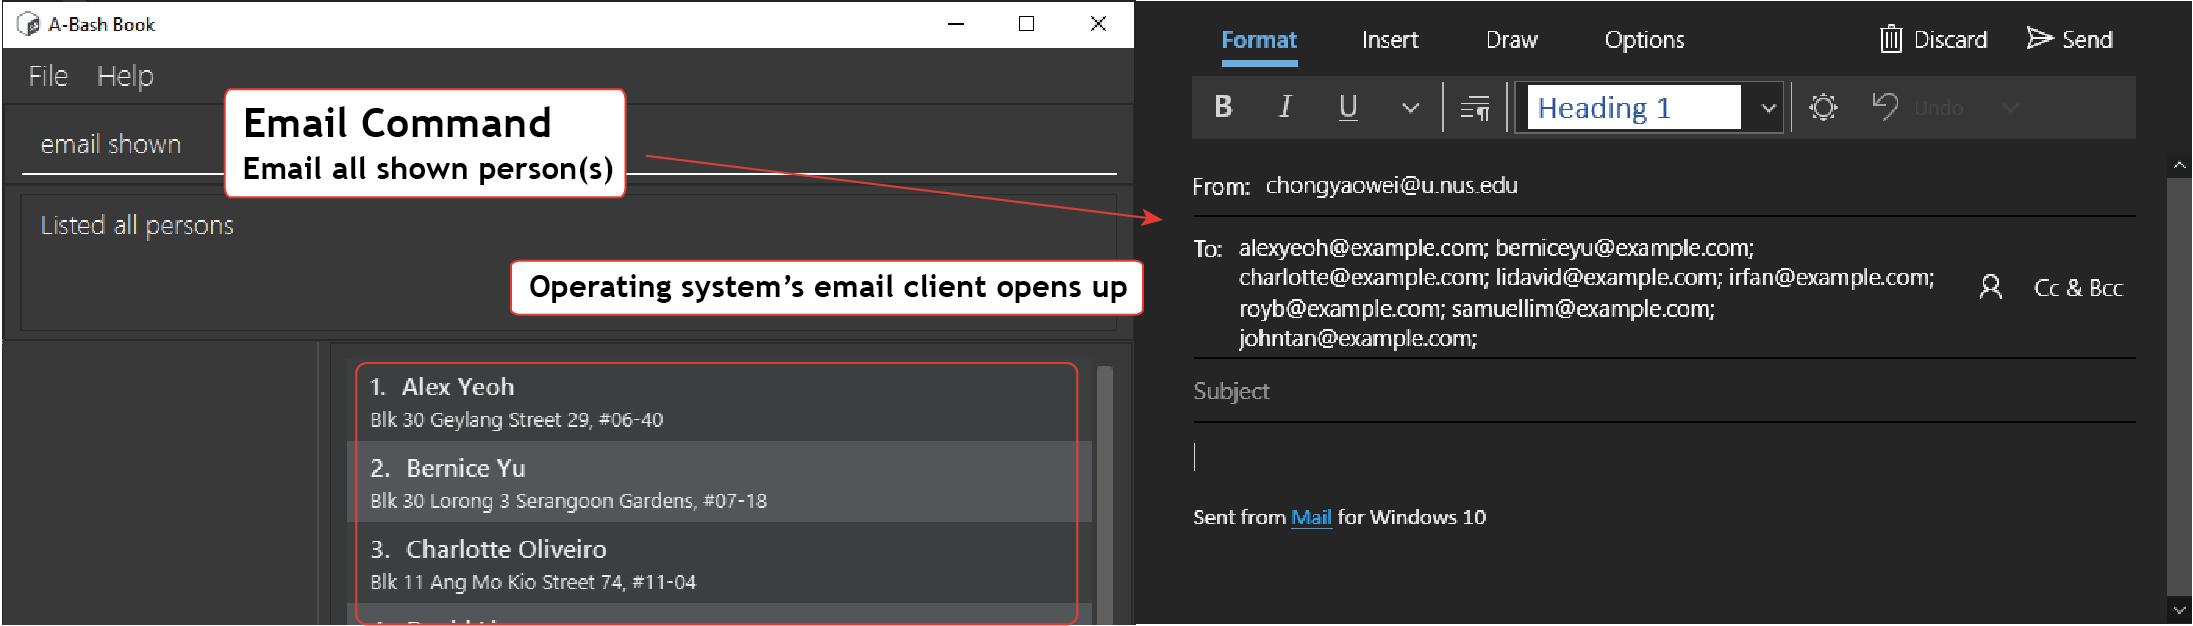
Examples:
| Example | Description |
|---|---|
email shown |
Email all persons show in the person list. |
email selected |
Email selected persons. |
email 1 |
Email person at index 1. |
email 1 2 |
Email person at index 1 and 2. |
Tagging Persons: tag
Add and delete specific tags of persons.
- Tags are case-insensitive. e.g.
Photoshoptag andphotoshoptag are treated as the same tag. - Same tags cannot be added to a person. e.g. A person cannot have both
Photoshopandphotoshoptags.
Add Tags to Persons: tag add
Add tags to persons in system.
- A
tag addcommand adding the samephotoshoptag to a person withPhotoshoptag will be executed successfully. - When adding a same tag to a person, the command will be executed successfully, but the same tag will not be added to the person.
- The command result will display the total number of persons the command has successfully executed on and not the total number of persons the tags are added to.
Format: tag add { shown | selected | INDEX ... } -t TAG [-t TAG]...

Examples:
| Example | Description |
|---|---|
tag add shown -t Photoshop |
Adds Photoshop tag to the persons shown in the UI. |
tag add selected -t Illustrator |
Adds Illustrator tag to the persons selected. |
tag add 1 2 3 -t Photoshop -t Illustrator |
Adds Photoshop and Illustrator tags to persons at index 1, 2 and 3. |
![]() Tip
Tip
You can bulk add tags to persons with:
-
tag add 1 2 3to add tags to persons at indexes 1, 2 and 3. -
tag add shownto add tags to all the shown persons. -
tag add selectedto add tags to all the selected persons.
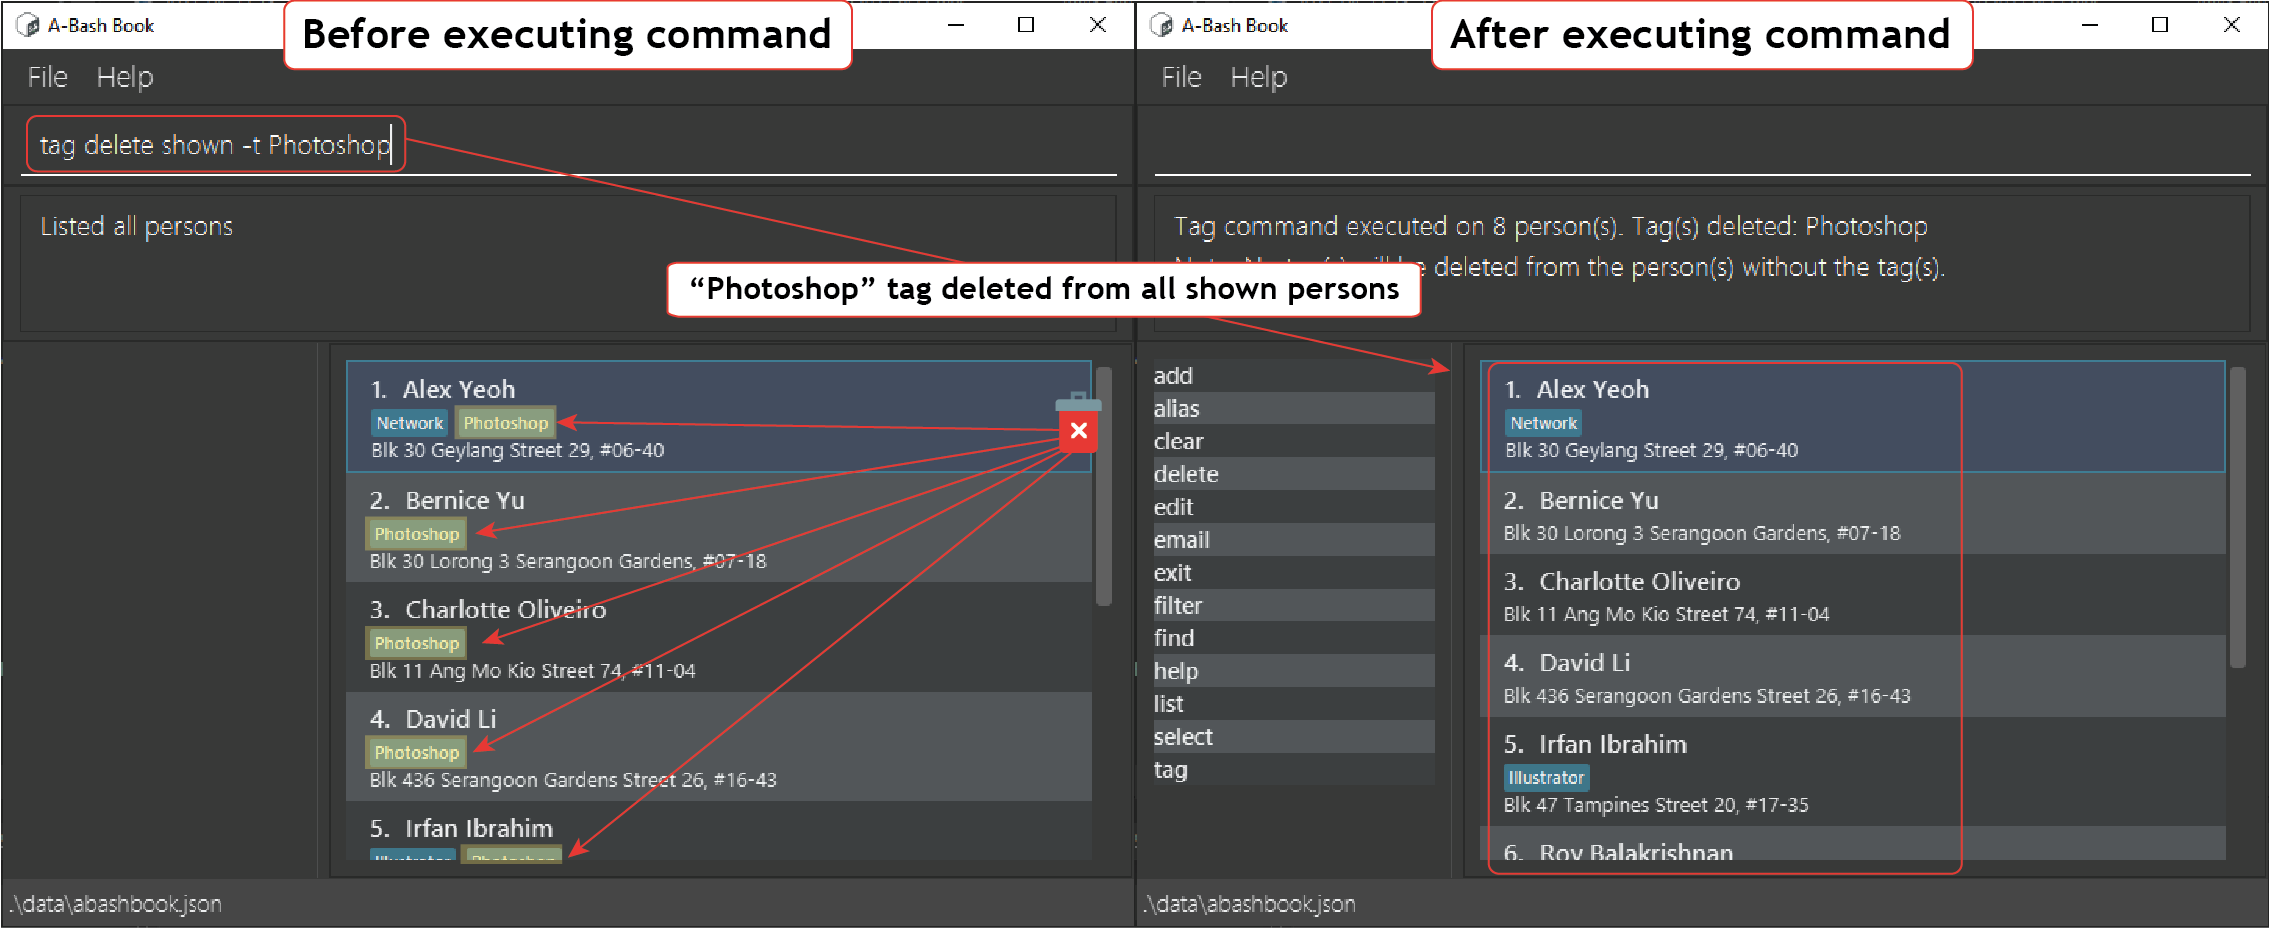
Delete Tags From Persons: tag delete
Delete tags from persons in system.
- A
tag deletecommand deleting thePhotoshoptag from a person withoutPhotoshoptag will be executed successfully. - When deleting a tag from a person without the tag, the command will be executed successfully, but no tags will be deleted from the person.
- The command result will display the total number of persons the command have successfully executed on and not the total number of persons the tags are deleted from.
Format: tag delete { shown | selected | INDEX... } -t TAG [-t TAG]...
Examples:
| Example | Description |
|---|---|
tag delete shown -t Photoshop |
Deletes Photoshop tag from the persons shown in the UI. |
tag delete selected -t Illustrator |
Deletes Illustrator tag from the persons selected. |
tag delete 1 2 3 -t Photoshop -t Illustrator |
Deletes Photoshop and Illustrator tags from persons at index 1, 2 and 3. |
![]() Tip
Tip
You can bulk delete tags from persons with:
-
tag delete 1 2 3to delete tags to persons at indexes 1, 2 and 3. -
tag delete shownto delete tags to all the shown persons. -
tag delete selectedto delete tags to all the selected persons.
Aliasing Commands : alias
The alias command allows you to create a shortcut command (also known as command alias) to the actual command.
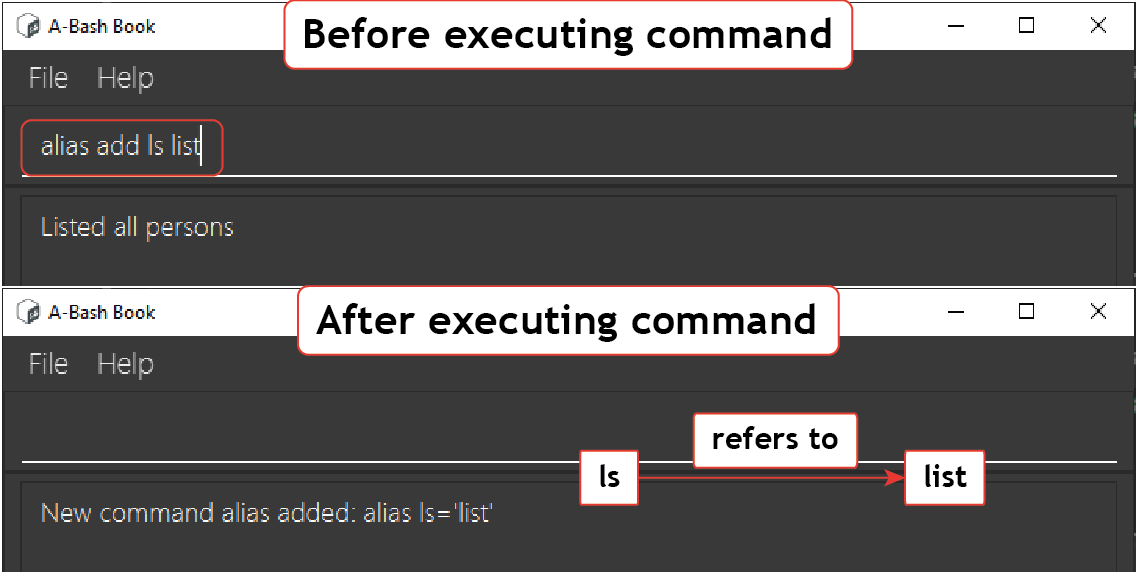
Add an Alias: alias add
Adds an alias to the system.
Format: alias add ALIAS COMMAND
-
ALIAScannot be an existing command. e.g.addandeditare existing commands and will not be accepted. -
COMMANDmust be a valid existing command. e.g.addandeditare existing commands and will be accepted.
Examples:
| Example | Description |
|---|---|
alias add ls list |
Associates a new ls command to list, such that the ls command will behave identically to the list command (i.e. ls will now generate the list of all persons). |
alias add ls list -n -p -e -t |
Associates a new ls command to list, such that the ls command will behave identically to the list command with the options (i.e. list -n -p -e -t). |
alias add f find |
Associates a new f command to find, such that the f command will behave identically to the find command (i.e. f Alex Yeoh will now return persons equal to or similar to Alex Yeoh). |
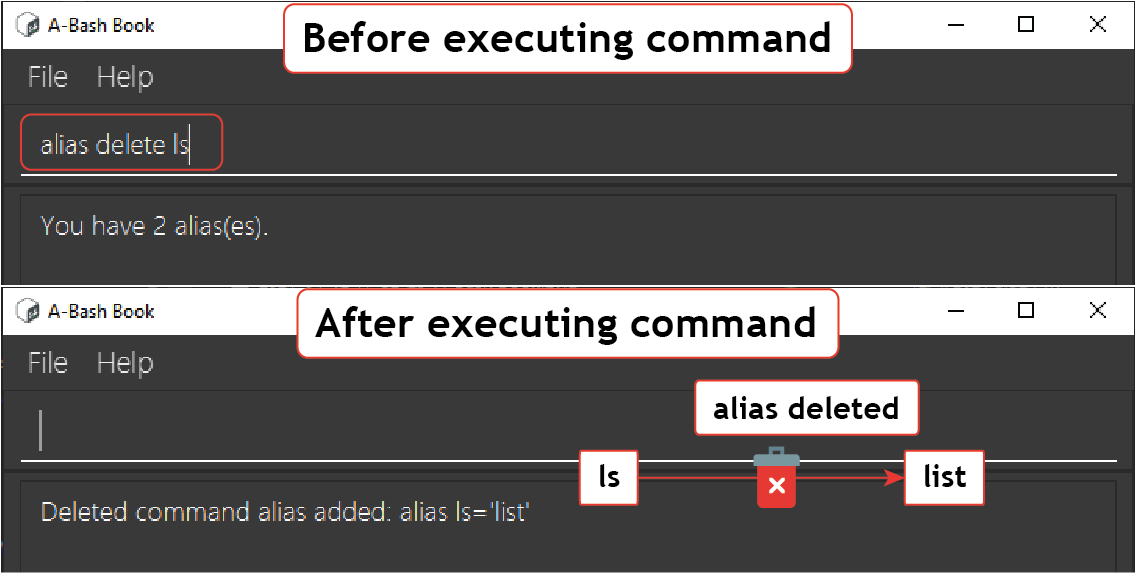
Delete an Alias: alias delete
Deletes an existing alias from the system.
Format: alias delete ALIAS
-
ALIASmust be an existing alias in the system.
Examples:
| Example | Description |
|---|---|
alias delete ls |
Removes the alias ls. |
alias delete f |
Removes the alias f. |
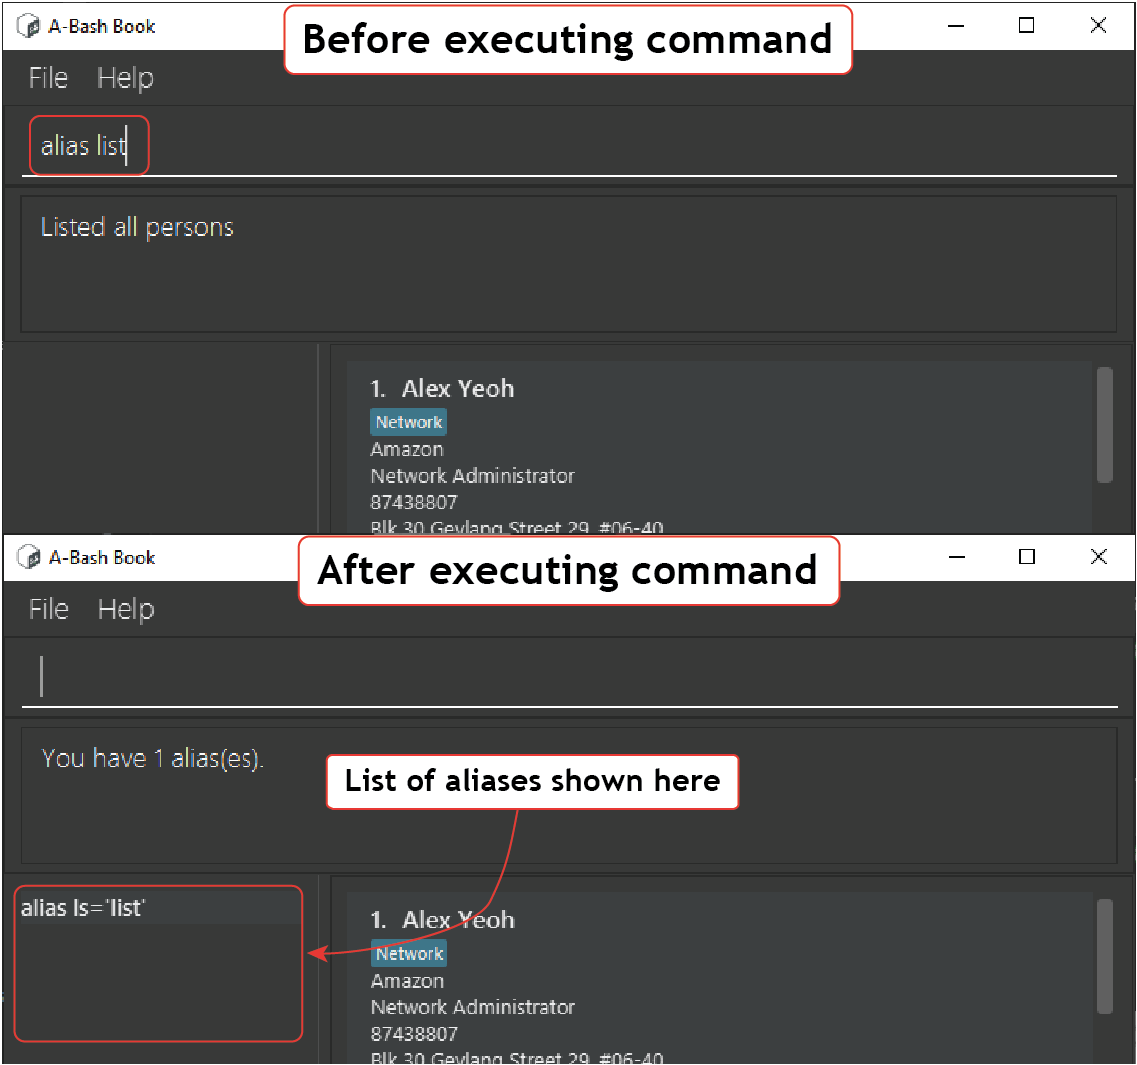
List All Aliases: alias list
Lists all aliases in the system.
- Your list of aliases will be displayed in the Command List Panel.
- On your next keyboard action, the list of your aliases will disappear and show the list of existing commands again.
Format: alias list
Autocomplete
Commands
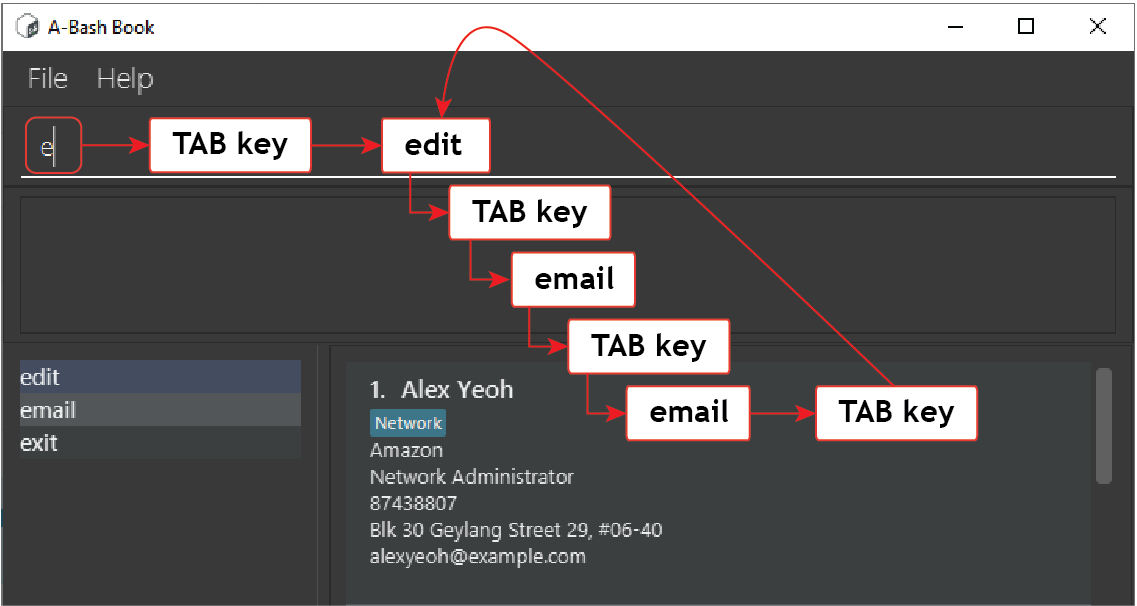
Commands in the command box can be autocompleted by pressing the Tab key.
Examples:
To execute the command delete,
Typing del followed by Tab will auto complete del to delete.
| Current text in command box | Key Press | Result |
|---|---|---|
ad |
Tab | add |
edi |
Tab | edit |
ex |
Tab | exit |
he |
Tab | help |
li |
Tab | list |
s |
Tab | select |
![]() Tip
Tip
In the command box, it is also possible to cycle through existing commands with Tab when you have not typed anything.
Flags
Command flags can be autocompleted at the end of your command text by pressing the Tab key.
- If your flag has no content, the next available flag will be replaced and cycled.
- If your flag has content, the next available flag will be appended to your command text.
| Supported Commands | Available command flags |
|---|---|
add |
-n , -p, -e, -a, -r, -t
|
edit |
-n , -p, -e, -a, -r, -t
|
Examples:
| Current text in command box | Key Press | Result |
|---|---|---|
add␣ |
Tab | add -n |
add -n |
Tab | add -p |
add -n John Doe |
Tab | add -n John Doe -p |
add -n John Doe -p 94326543 -e john@doe.com |
Tab | add -n John Doe -p 94326543 -e john@doe.com -a |
edit 1 |
Tab | edit 1 -n |
edit 1 -n |
Tab | edit 1 -p |
edit 1 -n John Dow |
Tab | edit 1 -n John Dow -p |
![]() Note
Note
For add command, a space character should follow the add command for flags to begin
autocompletion.
Index
Index can be autocompleted by pressing the Up/Down keys when the supported commands are fully typed out.
- Autocomplete index only works for the
editanddeletecommands.
Examples:
| Current text in command box | Key Press | Result |
|---|---|---|
edit |
Up/Down | edit 1 |
edit 1 |
Down | edit 2 |
edit 2 |
Up | edit 1 |
delete |
Up/Down | delete 1 |
delete 1 |
Down | delete 2 |
delete 2 |
Up | delete 1 |
Viewing Help : help
Displays a pop-up window with a summary of the commands available for use in A-Bash Book.
Format: help
Clearing All Entries : clear
Clears all entries in the system.
This action is irreversible. Do not run this command with actual data unless you want to delete all entries.
Format: clear
Exiting A-Bash Book : exit
Saves and exits A-Bash Book.
Format: exit
Saving the Data
A-Bash Book data is saved in the hard disk automatically after any command that changes the data. There is no need to save manually.
Editing the Data File
A-Bash Book data is saved as a JSON file [JAR file location]/data/abashbook.json. Advanced users
are welcome to update data directly by editing that data file.
If changes to the data file renders its format invalid, A-Bash Book will discard all data and start with an empty data file at the next run.
FAQ
What Is the Home Folder?
The home folder is the file system folder on your computer where A-Bash Book stores your data.
foldername (Home Folder)
├── abashbook.jar
├── abashbook.log.0
├── config.json
├── data
│   ├── abashbook.json
│   └── alias.json
├── preferences.json
How Do I Transfer My Data to Another Computer?
Install the app in the other computer and overwrite the empty data file it creates with the file that contains the data of your previous A-Bash Book home folder.
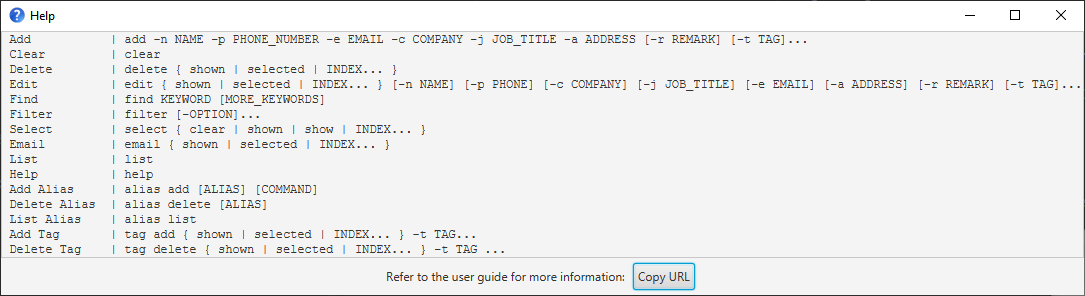
Command Summary
| Action | Format, Examples |
|---|---|
| Add |
add -n NAME -p PHONE_NUMBER -e EMAIL -c COMPANY -j JOB_TITLE -a ADDRESS [-r REMARK] [-t TAG]... e.g. add -n John Doe -p 98765432 -e johnd@example.com -c Google -j HR Manager -a John street -r Likes ramen -t friend -t colleague
|
| Clear | clear |
| Delete |
delete { shown | selected | INDEX... } e.g. delete 3
|
| Edit |
edit { shown | selected | INDEX... } [-n NAME] [-p PHONE] [-c COMPANY] [-j JOB_TITLE] [-e EMAIL] [-a ADDRESS] [-r REMARK] [-t TAG]... e.g., edit 2 -n James Lee -e jameslee@example.com
|
| Find |
find { KEYWORD... | -n NAME... | -e EMAIL... | -t TAG... | -r REMARK... } e.g. find James Jake
|
| Filter |
filter [-n] [-e] [-c] [-j] [-a] [-p] [-t] [-t] e.g. filter -p -a to see only the phone number and address |
| Select | select { clear | shown | show | INDEX... } |
email { shown | selected | INDEX... } |
|
| List | list |
| Help | help |
| Add Alias |
alias add [ALIAS] [COMMAND]e.g. alias add ls list
|
| Delete Alias |
alias delete [ALIAS]e.g. alias delete ls
|
| List Alias | alias list |
| Add Tag |
tag add { shown | selected | INDEX... } -t TAG [-t TAG]... e.g. tag add shown -t Illustrator
|
| Delete Tag |
tag delete { shown | selected | INDEX... } -t TAG [-t TAG]... e.g. tag delete 1 2 3 -t Photoshop -t Illustrator
|
Field Summary
| Field | Command Flag | Mandatory | Restrictions |
|---|---|---|---|
| Name | -n |
Yes | Names should only contain alphanumeric characters and spaces, and should not be blank. |
-e |
Yes | Emails should be of the format local-part@domain and adhere to the following constraints: 1. The local-part should only contain alphanumeric characters and the following special characters enclosed in parentheses ( !#$%&'*+/=?{|}~^.-). 2. This is followed by a ‘@’ and then a domain name. The domain name must: - be at least 2 characters long. - start and end with alphanumeric characters. |
|
| Company | -c |
Yes | Company can contain any character, and it should not be blank. |
| Job Title | -j |
Yes | Job Title can contain any character, and it should not be blank. |
| Address | -a |
Yes | Addresses can contain any character, and it should not be blank. |
| Phone Number | -p |
Yes | Phone numbers should only contain numbers, and be at least 3 digits long. |
| Tag | -t |
No | Tags names should only alphanumeric characters, and should not contain spaces or symbols. |
| Remark | -r |
No | Remark can contain any character. |
Glossary
| Term | Explanation |
|---|---|
| CLI | Command Line Interface. A text-based interface in which commands can be entered. |
| GUI | Graphical User Interface. Interactive visual components of an application. |
| JSON | JavaScript Object Notation. A data storage format. |
| Case-insensitive | Uppercase ABC and lowercase abc letters are treated as being the same. - Alex Yeoh and alex yeoh are treated as the same. - Photoshop and photoshop are treated as the same. |